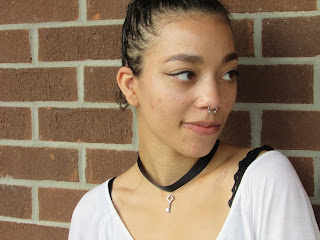
Choker
Chokers are cute accessories that gives a nice grungy feel to any outfit. I decided to make my own one day, and not sharing a good method of making one seemed rude. I will be using some ribbon I've had for ages that I never used, but you can use anything you want really. I have a YouTube video up on my process for those who don't want to read about it.
You can also buy this choker in my shop .
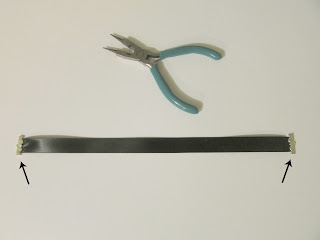
The things you will need for this DIY.


You can also buy this choker in my shop .

The things you will need for this DIY.
- Ribbon (any material you choose)
- Pliers
- Clasps
- A Lobster Claw Clasp and
- Lighter (do not use this if you are not old enough to do so. use it with caution)
- Pendant
- Attachment Ring
- Chains

- Step 1
Measure how large you want the necklace. Do you want it the pedant to hang below your clavicle, or above it? This your choice, so figure out how much ribbon should be cut out and cut it.
- Step 2
- Step 3

- Step 4
After you've done that attach the attachment ring as well as the pendant. You must attach them both together, so you won't have to do any later adjustments to the choker. Open the attachment ring with the pliers, slip it through the material and then slid the pendant on the open ring. Close the ring when you're finished attaching the pendant.


- Step 5

- Step 6
Now all you have to do is attach the lobster claw clasp and the hook. You are officially done making your own choker.


I am sorry for the terrible explanation, I was trying to make this as easy to follow as I possibly could.
Everything in this DIY was bought at Hobby Lobby, except for the key pendant. The key pendant was bought at Walmart.
If you want more DIY tutorials ,then please show some love by 1+ and sharing this post. Also if you follow this blog, or follow me on Google+ you'd get notified when I update instantly.
Alrighty I will see you guys Friday.


Comments
Post a Comment